Cómo instalar los certificados SSL de Let’s Encrypt en Ubuntu 18.04
Certbot es un cliente automatizado fácil de usar que recupera e implementa certificados SSL/TLS para su servidor web. Es una herramienta EFF que se utiliza para obtener certificados de Let’s Encrypt y habilitar automáticamente HTTPS en su servidor.En resumen, actúa como un «cliente Let’s Encrypt» o «cliente Let’s Encrypt Python». Utiliza el entorno de gestión automática de certificados (ACME) para implementar automáticamente certificados SSL gratuitos en los que confían la mayoría de los navegadores. Por lo tanto, funciona para cualquier otra CA que admita el protocolo ACME.
En este artículo, explicaré cómo obtener e instalar certificados SSL cifrados gratuitos usando Certbot para Apache y Nginx en servidores Ubuntu 18.04.
requisitos previos
- Un servidor Ubuntu Bionic Beaver (18.04) con privilegios de raíz para instalar los paquetes necesarios según sea necesario.
- Un dominio totalmente calificado que está registrado y tiene registros DNS apropiados. Aquí, en este artículo, estoy usando el dominio fosscloudy.com en todo momento.
Instalar Certbot
Inicialmente, para recuperar los certificados SSL de Letsencrypt, necesitaremos instalar el software Certbot. Aunque Certbot está disponible en Ubuntu últimamente, los paquetes tienden a estar desactualizados allí. Por lo tanto, es recomendable utilizar los repositorios de software de Ubuntu con el software más reciente para la instalación. Puede instalar Certbot usando los siguientes comandos a continuación:
#add-apt-repository ppa:certbot/certbot
#apt update
#apt install certbot
Puede confirmar la versión de Certbot instalada con este comando a continuación:
# certbot --version
certbot 0.23.0
Además, podemos usar este comando «complementos de certbot» para conocer los complementos de Certbot disponibles instalados en su servidor.
# certbot plugins
Saving debug log to /var/log/letsencrypt/letsencrypt.log

* standalone
Description: Spin up a temporary webserver
Interfaces: IAuthenticator, IPlugin
Entry point: standalone = certbot.plugins.standalone:Authenticator

* webroot
Description: Place files in webroot directory
Interfaces: IAuthenticator, IPlugin
Entry point: webroot = certbot.plugins.webroot:Authenticator
-------------------------------------------------------------------------------
De manera predeterminada, solo se incluirán en este paquete el complemento independiente y webroot. De acuerdo con nuestro propósito, aún podemos activar todos los complementos necesarios uno por uno.
Configuración del certificado Let’s Encrypt SSL en Apache
Certbot proporciona un complemento de Apache para facilitar la emisión de certificados SSL con esta herramienta. Podemos instalar este complemento ejecutando este comando a continuación:
#apt install python-certbot-apacheAhora estamos listos para usar esta herramienta, pero para configurar SSL para dominios, necesitaremos verificar algunos de los archivos de configuración de Apache. Para emitir el certificado SSL para un dominio, Certbot intentará recuperar el host virtual exacto del dominio en la configuración de su servidor Apache. Puede consultar mi artículo anterior que lo ayudará a configurar un host de dominio virtual. Suponiendo que haya un host virtual apropiado para nuestro dominio, podemos ejecutar este comando para instalar SSL para nuestro dominio fosscloudy.com.
# certbot --apache -d fosscloudy.com -d www.fosscloudy.com
Saving debug log to /var/log/letsencrypt/letsencrypt.log
Plugins selected: Authenticator apache, Installer apache
Obtaining a new certificate
Performing the following challenges:
http-01 challenge for fosscloudy.com
http-01 challenge for www.fosscloudy.com
Enabled Apache rewrite module
Waiting for verification...
Cleaning up challenges
Created an SSL vhost at /etc/apache2/sites-available/fosscloudy.com-le-ssl.conf
Deploying Certificate to VirtualHost /etc/apache2/sites-available/fosscloudy.com-le-ssl.conf
Enabling available site: /etc/apache2/sites-available/fosscloudy.com-le-ssl.conf
Deploying Certificate to VirtualHost /etc/apache2/sites-available/fosscloudy.com-le-ssl.conf
Please choose whether or not to redirect HTTP traffic to HTTPS, removing HTTP access.
-------------------------------------------------------------------------------
1: No redirect - Make no further changes to the webserver configuration.
2: Redirect - Make all requests redirect to secure HTTPS access. Choose this for
new sites, or if you're confident your site works on HTTPS. You can undo this
change by editing your web server's configuration.
-------------------------------------------------------------------------------
Select the appropriate number [1-2] then [enter] (press 'c' to cancel): 2
Enabled Apache rewrite module
Redirecting vhost in /etc/apache2/sites-enabled/fosscloudy.com.conf to ssl vhost in /etc/apache2/sites-available/fosscloudy.com-le-ssl.conf
-------------------------------------------------------------------------------
Congratulations! You have successfully enabled https://fosscloudy.com and
https://www.fosscloudy.com
You should test your configuration at:
https://www.ssllabs.com/ssltest/analyze.html?d=fosscloudy.com
https://www.ssllabs.com/ssltest/analyze.html?d=www.fosscloudy.com
-------------------------------------------------------------------------------
IMPORTANT NOTES:
- Congratulations! Your certificate and chain have been saved at:
/etc/letsencrypt/live/fosscloudy.com-0002/fullchain.pem
Your key file has been saved at:
/etc/letsencrypt/live/fosscloudy.com-0002/privkey.pem
Your cert will expire on 2018-09-03. To obtain a new or tweaked
version of this certificate in the future, simply run certbot again
with the "certonly" option. To non-interactively renew *all* of
your certificates, run "certbot renew"
- If you like Certbot, please consider supporting our work by:
Donating to ISRG / Let's Encrypt: https://letsencrypt.org/donate
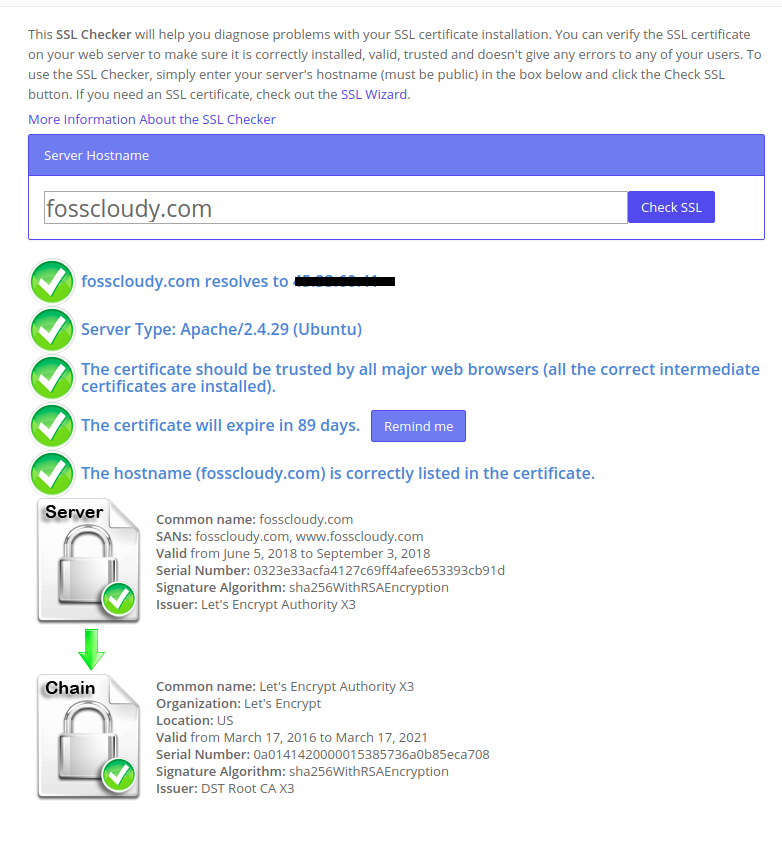
Donating to EFF: https://eff.org/donate-leEl procedimiento interactivo anterior lo guiará a través de toda la información necesaria para firmar/instalar el certificado para el dominio seleccionado. Su dominio SSL se descargará, instalará y configurará correctamente en su dominio de Virtual Host automáticamente con la ejecución de este comando. Ahora puede acceder a su dominio con HTTPS y confirmar que funciona o comprobar el estado de SSL en el Comprobador de SSL.
Opcionalmente, si tiene varios hosts/dominios virtuales configurados, puede usar el siguiente comando para instalar certificados SSL para ellos.
#certbot --apacheCertbot le pedirá que seleccione los dominios incluidos en el nuevo certificado.
Además, si no desea que Certbot instale/configure automáticamente su host virtual de dominio con el nuevo certificado SSL, puede usar el siguiente comando para generar solo el certificado SSL. Puede configurarlo manualmente más tarde.
#certbot --apache certonlyConfiguración del certificado SSL de Let’s Encrypt en Nginx
Para sus servidores que ejecutan el servidor web Nginx, podemos usar el complemento Certbot Nginx para obtener e instalar automáticamente certificados SSL. Puede instalar este complemento ejecutando este comando a continuación:
#apt install python-certbot-nginxAhora estamos listos para usar esta herramienta, pero para configurar SSL para dominios, necesitaremos verificar algunos de los archivos de configuración de Nginx. Para emitir el certificado SSL para un dominio, Certbot intentará recuperar el host virtual exacto del dominio en la configuración de su servidor Nginx. Suponiendo que haya un host virtual apropiado para nuestro dominio, podemos ejecutar este comando para instalar SSL para nuestro dominio fosscloudy.com.
# certbot --nginx -d fosscloudy.com -d www.fosscloudy.com
Saving debug log to /var/log/letsencrypt/letsencrypt.log
Plugins selected: Authenticator nginx, Installer nginx
Enter email address (used for urgent renewal and security notices) (Enter 'c' to
cancel): admin_linoxide@gmail.com
-------------------------------------------------------------------------------
Please read the Terms of Service at
https://letsencrypt.org/documents/LE-SA-v1.2-November-15-2017.pdf. You must
agree in order to register with the ACME server at
https://acme-v01.api.letsencrypt.org/directory
-------------------------------------------------------------------------------
(A)gree/(C)ancel: A
-------------------------------------------------------------------------------
Would you be willing to share your email address with the Electronic Frontier
Foundation, a founding partner of the Let's Encrypt project and the non-profit
organization that develops Certbot? We'd like to send you email about EFF and
our work to encrypt the web, protect its users and defend digital rights.
-------------------------------------------------------------------------------
(Y)es/(N)o: N
Obtaining a new certificate
Performing the following challenges:
http-01 challenge for fosscloudy.com
http-01 challenge for www.fosscloudy.com
Waiting for verification...
Cleaning up challenges
Deploying Certificate to VirtualHost /etc/nginx/sites-enabled/fosscloudy.com.conf
Deploying Certificate to VirtualHost /etc/nginx/sites-enabled/fosscloudy.com.conf
Please choose whether or not to redirect HTTP traffic to HTTPS, removing HTTP access.
-------------------------------------------------------------------------------
1: No redirect - Make no further changes to the webserver configuration.
2: Redirect - Make all requests redirect to secure HTTPS access. Choose this for
new sites, or if you're confident your site works on HTTPS. You can undo this
change by editing your web server's configuration.
-------------------------------------------------------------------------------
Select the appropriate number [1-2] then [enter] (press 'c' to cancel): 2
Redirecting all traffic on port 80 to ssl in /etc/nginx/sites-enabled/fosscloudy.com.conf
Redirecting all traffic on port 80 to ssl in /etc/nginx/sites-enabled/fosscloudy.com.conf
-------------------------------------------------------------------------------
Congratulations! You have successfully enabled https://fosscloudy.com and
https://www.fosscloudy.com
You should test your configuration at:
https://www.ssllabs.com/ssltest/analyze.html?d=fosscloudy.com
https://www.ssllabs.com/ssltest/analyze.html?d=www.fosscloudy.com
-------------------------------------------------------------------------------
IMPORTANT NOTES:
- Congratulations! Your certificate and chain have been saved at:
/etc/letsencrypt/live/fosscloudy.com/fullchain.pem
Your key file has been saved at:
/etc/letsencrypt/live/fosscloudy.com/privkey.pem
Your cert will expire on 2018-09-03. To obtain a new or tweaked
version of this certificate in the future, simply run certbot again
with the "certonly" option. To non-interactively renew *all* of
your certificates, run "certbot renew"
- Your account credentials have been saved in your Certbot
configuration directory at /etc/letsencrypt. You should make a
secure backup of this folder now. This configuration directory will
also contain certificates and private keys obtained by Certbot so
making regular backups of this folder is ideal.
- If you like Certbot, please consider supporting our work by:
Donating to ISRG / Let's Encrypt: https://letsencrypt.org/donate
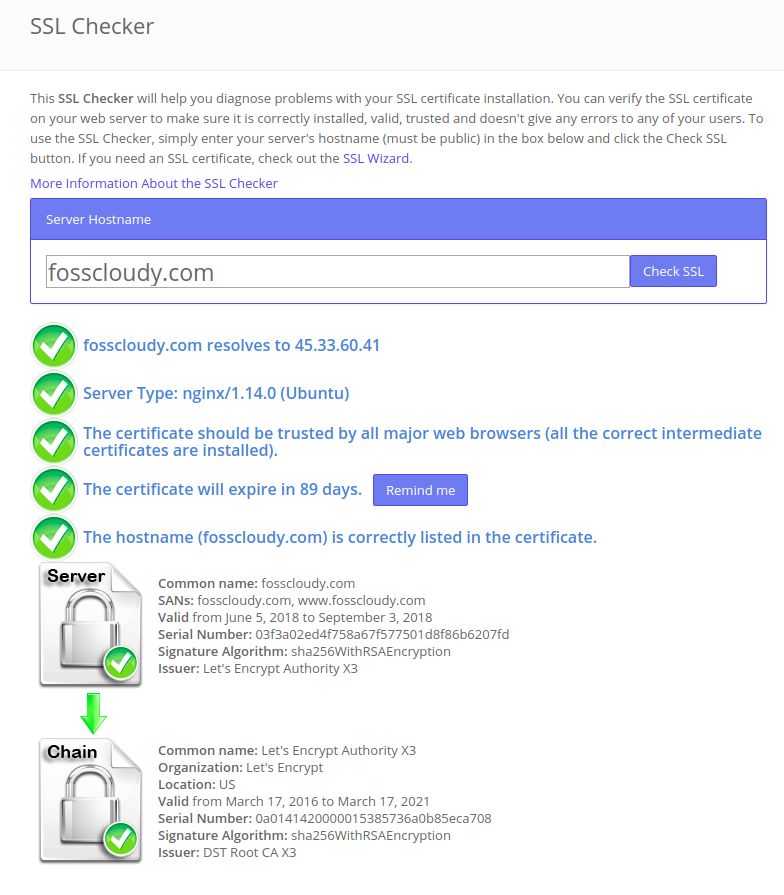
Donating to EFF: https://eff.org/donate-leEste procedimiento interactivo autoexplicativo lo ayudará a generar/instalar/configurar automáticamente el certificado SSL para su dominio. Su dominio SSL se descargará, instalará y configurará correctamente en su dominio de Virtual Host automáticamente con la ejecución de este comando. Ahora puede acceder a su dominio con HTTPS y confirmar que funciona o comprobar el estado de SSL en el Comprobador de SSL. Puede reemplazar mi dominio fosscloudy.com con el suyo y ejecutar el mismo comando para generar su certificado SSL.
De manera similar al complemento de Apache, si tiene configurados varios hosts/dominios virtuales, puede usar el siguiente comando para instalar certificados SSL para todos ellos.
#certbot --nginxCertbot le pedirá que seleccione los dominios incluidos en el nuevo certificado.
Además, si no desea que Certbot instale/configure automáticamente su dominio de host virtual con el nuevo certificado SSL, puede usar el siguiente comando para generar el certificado SSL que luego puede configurar manualmente.
#certbot --nginx certonlyConfiguración de certificados para cifrar Wildcard usando Certbot
Let’s Encrypt recientemente comenzó a aceptar certificados comodín utilizando su nuevo protocolo ACME2. Esto significa que puede tener un solo certificado comodín como *.fosscloudy.com y usarlo en todos los demás subdominios de dominio como docs.fosscloudy.com, blog.fosscloudy.com, mail.fosscloudy.com, etc. muy fácil de administrar eficientemente certificados para muchos subdominios de dominio. Puede generar este certificado SSL comodín para fosscloudy.com ejecutando este comando a continuación. Puede modificar este comando con su dominio preferido, reemplazando fosscloudy.com.
# certbot certonly --manual -d *.fosscloudy.com --agree-tos --no-bootstrap --manual-public-ip-logging-ok --preferred-challenges dns-01 --server https://acme-v02.api.letsencrypt.org/directory
Saving debug log to /var/log/letsencrypt/letsencrypt.log
Plugins selected: Authenticator manual, Installer None
Obtaining a new certificate
Performing the following challenges:
dns-01 challenge for fosscloudy.com

-------------------------------------------------------------------------------
Please deploy a DNS TXT record under the name
_acme-challenge.fosscloudy.com with the following value:

z25SzIfe37x5va0ynh6KdmEYVjjuSvdUOGM_t_twsVk

Before continuing, verify the record is deployed.
-------------------------------------------------------------------------------
Press Enter to Continue
Waiting for verification...
Cleaning up challenges

IMPORTANT NOTES:
- Congratulations! Your certificate and chain have been saved at:
/etc/letsencrypt/live/fosscloudy.com-0001/fullchain.pem
Your key file has been saved at:
/etc/letsencrypt/live/fosscloudy.com-0001/privkey.pem
Your cert will expire on 2018-09-03. To obtain a new or tweaked
version of this certificate in the future, simply run certbot
again. To non-interactively renew *all* of your certificates, run
"certbot renew"
- If you like Certbot, please consider supporting our work by:

Donating to ISRG / Let's Encrypt: https://letsencrypt.org/donate
Donating to EFF: https://eff.org/donate-le
Como se menciona en este procedimiento interactivo, le pedirá que agregue un registro TXT específico a sus registros DNS. En mi caso, informó la configuración de TXT de la siguiente manera:
-------------------------------------------------------------------------------
Please deploy a DNS TXT record under the name
_acme-challenge.fosscloudy.com with the following value:

z25SzIfe37x5va0ynh6KdmEYVjjuSvdUOGM_t_twsVk

Before continuing, verify the record is deployed.
-------------------------------------------------------------------------------
Press Enter to Continue
En su proveedor de DNS, creará un nuevo registro DNS TXT con:
Record Name: _acme-challenge (you may or may not need the .fosscloudy.com suffix depending on your DNS provider.
Record Value: z25SzIfe37x5va0ynh6KdmEYVjjuSvdUOGM_t_twsVk (replace this with the value provided by Certbot)
Guarde su configuración de DNS y presione Entrar en la ventana de Certbot para activar la verificación y completarla. Tendrá que esperar un tiempo para que el nuevo registro DNS se propague a Internet. Esperé 30 minutos y presioné enter. Incluso puede establecer un valor TTL más bajo para acelerar este proceso.
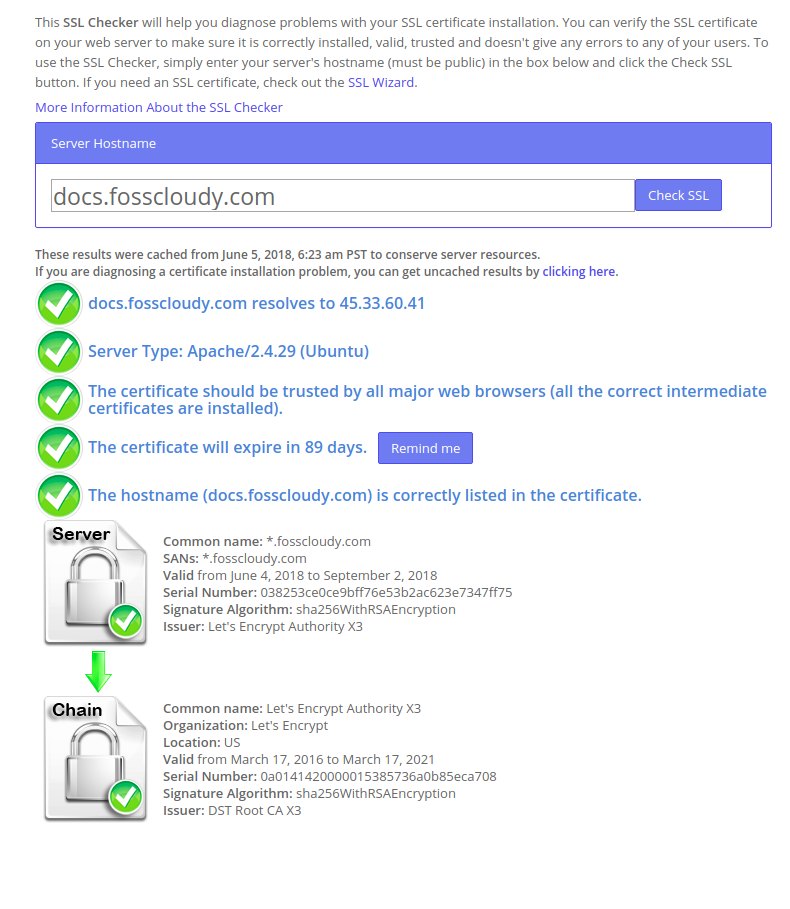
¡¡Felicidades!! Se genera el certificado comodín para su dominio fosscloudy.com. Ahora puede usar este certificado comodín con cualquier subdominio creado para su nombre de dominio. Por ejemplo, creé un subdominio para este dominio, a saber, docs.fosscloudy.com. Utilizará estos certificados SSL comodín instalados para el dominio principal. Puede acceder a su subdominio con HTTPS en su navegador y confirmar que funciona.
Renovación automática de certificados SSL
Puede utilizar cualquiera de estos métodos mencionados anteriormente para obtener sus certificados SSL. Pero todos estos certificados de Let’s Encrypt son de corta duración y solo serán válidos durante 90 días. Por tanto, es obligatorio renovar estos certificados antes de que caduquen para facilitar el normal funcionamiento de sus sitios web. Puede hacerlo manualmente si lo necesita, o puede automatizar este proceso usando cronjobs o el cliente Certbot.
Cuando un certificado se instala correctamente mediante la ejecución de los métodos anteriores, recibirá un mensaje similar a este:
IMPORTANT NOTES:
- Congratulations! Your certificate and chain have been saved at:
/etc/letsencrypt/live/fosscloudy.com/fullchain.pem
Your key file has been saved at:
/etc/letsencrypt/live/fosscloudy.com/privkey.pem
Your cert will expire on 2018-09-03. To obtain a new or tweaked
version of this certificate in the future, simply run certbot again
with the "certonly" option. To non-interactively renew *all* of
your certificates, run "certbot renew"
Este mensaje indica claramente cómo renovar su certificado en el futuro con "certbot renew" dominio.
Probemos el proceso de renovación automática con el siguiente comando:
#certbot renewEste comando verificará si los SSL del dominio deben renovarse y renovará los SSL del dominio que deben renovarse.
La buena noticia es que los paquetes de Certbot en nuestro servidor vienen con un cronjob que renovará automáticamente nuestros certificados SSL antes de que caduquen. Dado que los certificados de Let’s Encrypt duran 90 días, se recomienda encarecidamente que aproveche esta función.
# cat /etc/cron.d/certbot
# /etc/cron.d/certbot: crontab entries for the certbot package
#
# Upstream recommends attempting renewal twice a day
#
# Eventually, this will be an opportunity to validate certificates
# haven't been revoked, etc. Renewal will only occur if expiration
# is within 30 days.
SHELL=/bin/sh
PATH=/usr/local/sbin:/usr/local/bin:/sbin:/bin:/usr/sbin:/usr/bin

0 */12 * * * root test -x /usr/bin/certbot -a ! -d /run/systemd/system && perl -e 'sleep int(rand(43200))' && certbot -q renew
Este cron se ejecutará dos veces al día, pero no renovará los certificados a menos que estén a punto de caducar.
Lea también:
Let’s Encrypt cambió literalmente la forma en que generamos, instalamos y usamos certificados SSL. Con sus procedimientos automatizados utilizando la herramienta Certbot, puede ver lo fácil que es obtener certificados SSL gratuitos en segundos de Let’s Encrypt e instalarlos en minutos, automáticamente. Espero que este artículo sea informativo y útil para usted. Por favor publique sus valiosos comentarios y sugerencias al respecto.