Cómo instalar Drupal 8 con LetsEncrypt SSL en Debian 9
 Drupal es un software de gestión de contenido de código abierto escrito en PHP y distribuido bajo GPL. Tiene excelentes características estándar, como la creación de contenido sencilla, un rendimiento confiable y una excelente seguridad. La flexibilidad y la modularidad son uno de sus principios fundamentales que lo distinguen del resto. Tiene varias herramientas que le ayudan a crear un contenido versátil y estructurado que necesitan las experiencias web dinámicas.
Drupal 8 está destinado a ser la mayor actualización en la historia de Drupal. Crear contenido es mucho más fácil en eso. Cada tema incorporado está diseñado de manera receptiva. Está disponible en 100 idiomas y sus herramientas de integración lo convierten en un gran centro para ecosistemas complejos.
En este artículo, demostraré cómo instalar este Drupal 8 con Letsencrypt SSL en nuestros últimos servidores Debian 9. Repasemos los pasos de instalación uno por uno.
Requisitos
- Un servidor Debian completamente funcional
- Configuración de LAMP (Apache, MariaDB y PHP)
1) Empiece
Siempre se recomienda actualizar los paquetes de su servidor a los estables antes de cualquier instalación. Podemos hacer esto simplemente ejecutando el comando de actualización como se muestra a continuación:
#apt-get update -y
Además, podemos agregar algunas herramientas de uso común que ayudaremos a través de nuestra instalación.
#apt-get install wget git unzip nano -y
2) Instale Apache, MariaDB y PHP
Antes de comenzar con la instalación de Drupal, necesitará un servidor web en ejecución y un servidor de base de datos. En este artículo trabajaremos con Apache2, PHP7 y MariaDB, puedes instalarlos fácilmente con la ayuda de nuestra herramienta de administración de paquetes llamada apt.
Primero, comience con la instalación del servidor web Apache con el siguiente comando:
# apt-get install apache2 -y
Después de la instalación, debe iniciar el servicio Apache y habilitarlo para que se inicie automáticamente en el próximo inicio del sistema. Para hacerlo, ejecute el siguiente comando:
# systemctl start apache2
# systemctl enable apache2
Synchronizing state of apache2.service with SysV service script with /lib/systemd/systemd-sysv-install.
Executing: /lib/systemd/systemd-sysv-install enable apache2
root@debian:~# systemctl status apache2
● apache2.service - The Apache HTTP Server
Loaded: loaded (/lib/systemd/system/apache2.service; enabled; vendor preset: enabled)
Active: active (running) since Wed 2017-07-19 13:12:00 UTC; 36s ago
Main PID: 12639 (apache2)
CGroup: /system.slice/apache2.service
├─12639 /usr/sbin/apache2 -k start
├─12641 /usr/sbin/apache2 -k start
└─12642 /usr/sbin/apache2 -k start
En segundo lugar, necesitamos instalar PHP con los módulos requeridos ejecutando el siguiente comando:
# apt-get install php7.0 libapache2-mod-php7.0 php7.0-cli php7.0-mcrypt php7.0-intl php7.0-mysql php7.0-curl php7.0-gd php7.0-soap php7.0-xml php7.0-zip -y
A continuación, necesitamos modificar algunas variables de PHP en nuestro archivo de configuración /etc/php/7.0/cli/php.ini dependiendo de los recursos de nuestro servidor como se muestra a continuación:
memory_limit = 512M
date.timezone = UTC
cgi.fix_pathinfo=0
upload_max_filesize = 10M
post_max_size = 10M

After making these changes don't forget to restart the Apache server.
Ahora necesitamos instalar nuestro servidor de base de datos. Puede instalarlo ejecutando el siguiente comando:
# apt-get install mariadb-server -y
Después de la instalación, debe iniciar el servicio MariaDB y habilitarlo para que se inicie automáticamente en el próximo inicio del sistema. Para hacerlo, ejecute el siguiente comando:
# systemctl start mysql
# systemctl enable mysql
Synchronizing state of mysql.service with SysV service script with /lib/systemd/systemd-sysv-install.
Executing: /lib/systemd/systemd-sysv-install enable mysql
root@debian:~# systemctl status mysql
● mariadb.service - MariaDB database server
Loaded: loaded (/lib/systemd/system/mariadb.service; enabled; vendor preset: enabled)
Active: active (running) since Wed 2017-07-19 13:26:43 UTC; 43s ago
Main PID: 26526 (mysqld)
Status: "Taking your SQL requests now..."
CGroup: /system.slice/mariadb.service
└─26526 /usr/sbin/mysqld
A continuación, deberá proteger su servidor de base de datos. Puede ejecutar el siguiente comando para proteger la base de datos MariaDB y establecer la contraseña de root:
# mysql_secure_installation

NOTE: RUNNING ALL PARTS OF THIS SCRIPT IS RECOMMENDED FOR ALL MariaDB
SERVERS IN PRODUCTION USE! PLEASE READ EACH STEP CAREFULLY!

In order to log into MariaDB to secure it, we'll need the current
password for the root user. If you've just installed MariaDB, and
you haven't set the root password yet, the password will be blank,
so you should just press enter here.

Enter current password for root (enter for none):
OK, successfully used password, moving on...

Setting the root password ensures that nobody can log into the MariaDB
root user without the proper authorisation.
Set root password? [Y/n] y
New password:docker123
Re-enter new password:
Password updated successfully!
Reloading privilege tables..
... Success!

By default, a MariaDB installation has an anonymous user, allowing anyone
to log into MariaDB without having to have a user account created for
them. This is intended only for testing, and to make the installation
go a bit smoother. You should remove them before moving into a
production environment.

Remove anonymous users? [Y/n] y
... Success!

Normally, root should only be allowed to connect from 'localhost'. This
ensures that someone cannot guess at the root password from the network.

Disallow root login remotely? [Y/n] y
... Success!
By default, MariaDB comes with a database named 'test' that anyone can
access. This is also intended only for testing, and should be removed
before moving into a production environment.

Remove test database and access to it? [Y/n] y
- Dropping test database...
... Success!
- Removing privileges on test database...
... Success!

Reloading the privilege tables will ensure that all changes made so far
will take effect immediately.

Reload privilege tables now? [Y/n] y
... Success!

Cleaning up...

All done! If you've completed all of the above steps, your MariaDB
installation should now be secure.

Thanks for using MariaDB!
3) Crea una base de datos Drupal
Necesitaremos crear una base de datos y un usuario para nuestra instalación de Drupal, para hacerlo, ejecute el siguiente comando:
.# mysql -u root -p
Welcome to the MariaDB monitor. Commands end with ; or g.
Your MariaDB connection id is 10
Server version: 10.1.23-MariaDB-9+deb9u1 Debian 9.0

Copyright (c) 2000, 2017, Oracle, MariaDB Corporation Ab and others.

Type 'help;' or 'h' for help. Type 'c' to clear the current input statement.

MariaDB [(none)]> CREATE DATABASE drupal_db;
Query OK, 1 row affected (0.00 sec)
MariaDB [(none)]> GRANT ALL PRIVILEGES on drupal_db.* to 'drupaluser'@'localhost' identified by 'drupal123';
Query OK, 0 rows affected (0.00 sec)

MariaDB [(none)]> flush privileges;
Query OK, 0 rows affected (0.00 sec)

MariaDB [(none)]> quit
Nos conectamos al shell MySQL y creamos una base de datos llamada «drupal_db» con un usuario «drupaluser» para la instalación de Drupal.
4) Descargue e instale Drupal 8.3.5
Puede descargar e instalar Drupal desde su página web oficial. He descargado el último software Drupal disponible de su sitio web.
# wget https://ftp.drupal.org/files/projects/drupal-8.3.5.zip
 Afterward, extract the downloaded zip file and move the extracted Drupal directory to the Drupal root directory (/var/www/html/drupal/) which we have meant for the Drupal installation.

# unzip drupal-8.3.5.zip
# mv drupal-8.3.5 /var/www/html/drupal
# chmod -R 777 /var/www/html/drupal
5) Cree SSL para su dominio Drupal usando Letsencrypt
Estoy planeando configurar mi Drupal en el dominio nodenixbox.com. Por lo tanto, necesito configurar SSL para este dominio para asegurar mi instalación de Drupal. Dos de estos paquetes deben instalarse antes de la instalación de Let’s Encrypt. Bc es una “calculadora de lenguaje de precisión arbitraria. Se utiliza para el script de renovación automática en el software Let’s Encrypt. Puede instalar estos paquetes con estos comandos a continuación:
#apt-get install git bc -y
Una vez hecho esto, podemos descargar fácilmente vamos a cifrar clonando el repositorio de GitHub.
# git clone https://github.com/letsencrypt/letsencrypt
Ahora, podemos movernos a nuestra carpeta de instalación de letsencrypt y ejecutar este comando para emitir nuestro certificado SSL.
# ./letsencrypt-auto certonly --standalone --email saheetha1@gmail.com --agree-tos -d nodenixbox.com
-------------------------------------------------------------------------------
Would you be willing to share your email address with the Electronic Frontier
Foundation, a founding partner of the Let's Encrypt project and the non-profit
organization that develops Certbot? We'd like to send you email about EFF and
our work to encrypt the web, protect its users and defend digital rights.
-------------------------------------------------------------------------------
(Y)es/(N)o: yes
Obtaining a new certificate
Performing the following challenges:
tls-sni-01 challenge for nodenixbox.com
Waiting for verification...
Cleaning up challenges

IMPORTANT NOTES:
- Congratulations! Your certificate and chain have been saved at
/etc/letsencrypt/live/nodenixbox.com/fullchain.pem. Your cert will
expire on 2017-10-18. To obtain a new or tweaked version of this
certificate in the future, simply run letsencrypt-auto again. To
non-interactively renew *all* of your certificates, run
"letsencrypt-auto renew"
- Your account credentials have been saved in your Certbot
configuration directory at /etc/letsencrypt. You should make a
secure backup of this folder now. This configuration directory will
also contain certificates and private keys obtained by Certbot so
making regular backups of this folder is ideal.
- If you like Certbot, please consider supporting our work by:
Donating to ISRG / Let's Encrypt: https://letsencrypt.org/donate
Donating to EFF: https://eff.org/donate-le
6) Creando el host virtual para su dominio Drupal
En primer lugar, deberá crear un archivo de host virtual Apache para drupal. Para hacerlo, cree un nuevo archivo drupal.conf dentro del directorio / etc / apache2 / sites-available / copiando el formato Vhost predeterminado desde allí:
# cp -rp 000-default.conf drupal.conf
Y después de eso, podemos modificar el host virtual según nuestro nombre de dominio y la raíz del documento.
:/etc/apache2/sites-available# cat drupal.conf
<VirtualHost *:80>
# The ServerName directive sets the request scheme, hostname and port that
# the server uses to identify itself. This is used when creating
# redirection URLs. In the context of virtual hosts, the ServerName
# specifies what hostname must appear in the request's Host: header to
# match this virtual host. For the default virtual host (this file) this
# value is not decisive as it is used as a last resort host regardless.
# However, you must set it for any further virtual host explicitly.
ServerName nodenixbox.com

ServerAdmin webmaster@localhost
DocumentRoot /var/www/html/drupal/

# Available loglevels: trace8, ..., trace1, debug, info, notice, warn,
# error, crit, alert, emerg.
# It is also possible to configure the loglevel for particular
# modules, e.g.
#LogLevel info ssl:warn

ErrorLog ${APACHE_LOG_DIR}/error.log
CustomLog ${APACHE_LOG_DIR}/access.log combined

# For most configuration files from conf-available/, which are
# enabled or disabled at a global level, it is possible to
# include a line for only one particular virtual host. For example the
# following line enables the CGI configuration for this host only
# after it has been globally disabled with "a2disconf".
#Include conf-available/serve-cgi-bin.conf
</VirtualHost>
Una vez hecho esto, podemos habilitar el host virtual y habilitar el módulo de reescritura con el siguiente comando:
# a2ensite drupal
Enabling site drupal.
To activate the new configuration, you need to run:
systemctl reload apache2

# a2enmod rewrite
Enabling module rewrite.
To activate the new configuration, you need to run:
systemctl restart apache2
# systemctl restart apache2
Solo debemos asegurarnos de reiniciar el servicio Apache después de estos cambios.
7) Asegurar la instalación de Drupal con Letsencrypt SSL
Para asegurar nuestra instalación de Drupal, necesitamos habilitar el host virtual SSL para nuestro dominio. Puede hacer esto copiando el host virtual SSL predeterminado en la carpeta / etc / apache2 / sites-available / a drupal-ssl.conf y modificándolo con nuestros detalles de Letsencrypt SSL.
# cp -rp default-ssl.conf drupal-ssl.conf
Y modifique estas secciones para habilitar SSL para nuestro dominio Drupal.
# cat drupal-ssl.conf
<IfModule mod_ssl.c>
<VirtualHost nodenixbox.com:443>
ServerAdmin webmaster@localhost

DocumentRoot /var/www/html/drupal/

SSLCertificateFile /etc/letsencrypt/live/nodenixbox.com/fullchain.pem
SSLCertificateKeyFile /etc/letsencrypt/live/nodenixbox.com/privkey.pem


<FilesMatch ".(cgi|shtml|phtml|php)$">
SSLOptions +StdEnvVars
</FilesMatch>
<Directory /usr/lib/cgi-bin>
SSLOptions +StdEnvVars
</Directory>


</VirtualHost>
</IfModule>
Después de modificar el host virtual, necesitamos habilitar SSL y reiniciar Apache.
# a2enmod ssl
Considering dependency setenvif for ssl:
Module setenvif already enabled
Considering dependency mime for ssl:
Module mime already enabled
Considering dependency socache_shmcb for ssl:
Enabling module socache_shmcb.
Enabling module ssl.
See /usr/share/doc/apache2/README.Debian.gz on how to configure SSL and create self-signed certificates.
To activate the new configuration, you need to run:
systemctl restart apache2

#systemctl restart apache2
8) Acceda a la interfaz web de Drupal
Hemos instalado y configurado el dominio Drupal ahora. A continuación, debemos completar la instalación de Drupal accediendo a través del navegador web. Puede acceder a su interfaz de Drupal en la URL >> https://nodenixbox.com/. Debería ver la primera página para elegir el idioma preferido.

Elijo el idioma inglés y hago clic en el botón Guardar y continuar, esto lo llevará a la página siguiente:

Seleccione su perfil de instalación preferido y haga clic en el botón Guardar y continuar, luego verifique todos los requisitos y haga clic en el botón Guardar y continuar. Debería ver la siguiente imagen:
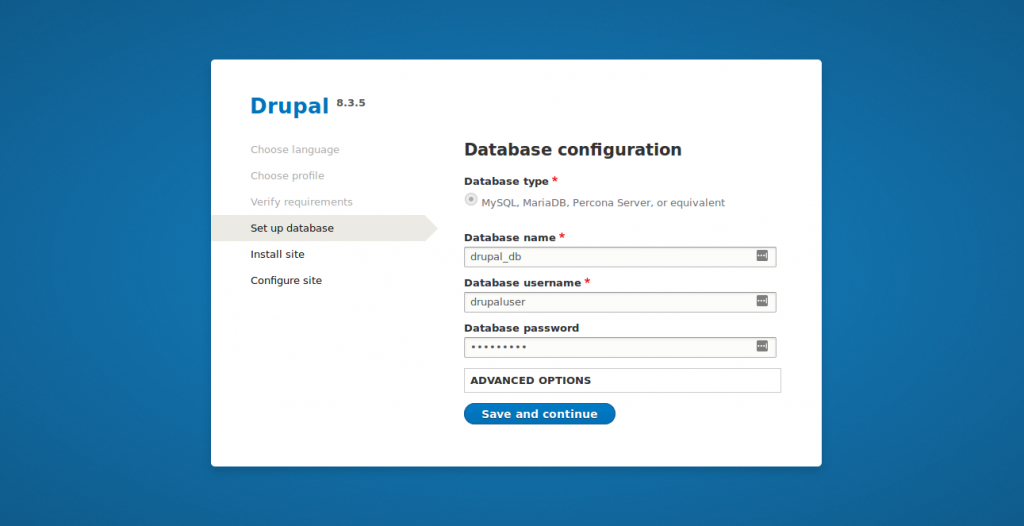
Ahora puede agregar los detalles de la base de datos configurados para su dominio Drupal y hacer clic en Guardar y continuar para continuar con la instalación.

A continuación, puede configurar su página de dominio Drupal, proporcionar el nombre de su sitio, el nombre de usuario de administrador y la contraseña y luego hacer clic en el botón Guardar y continuar para comenzar a instalar Drupal. Una vez instalado Drupal, debería ver el panel de Drupal en la siguiente imagen:

¡Eso es todo! ha instalado Drupal correctamente en su servidor Debian 9. Ahora puede continuar y configurar Drupal según sus requisitos.
Para obtener más documentación, puede visitar los documentos oficiales que proporciona el proyecto Drupal en. Espero que este artículo te sea de utilidad. Publique sus valiosas sugerencias y comentarios al respecto.