Cómo ejecutar Puppet en una infraestructura de contenedores usando Docker
Docker es una tecnología basada en contenedores de código abierto. Nos está dando un flujo de trabajo en torno a los contenedores que es mucho más fácil de usar. Docker separa la aplicación del sistema operativo subyacente mediante la tecnología de contenedor, similar a cómo las máquinas virtuales separan el sistema operativo del hardware subyacente.
Contenedor Docker Vs Máquinas Virtuales
Las máquinas virtuales incluyen aplicaciones, binarios y bibliotecas necesarios junto con un sistema operativo invitado completo que puede pesar alrededor de 10 de GB.
Mientras que, el contenedor de Docker Engine comprende solo la aplicación y sus dependencias. Se ejecuta como un proceso aislado en el espacio de usuario del sistema operativo host, compartiendo el kernel con otros contenedores. Por lo tanto, disfruta de los beneficios de asignación y aislamiento de recursos de las máquinas virtuales, pero es mucho más rápido, portátil, escalable y eficiente.
Beneficios de Docker
Escalabilidad: Estos contenedores son extremadamente livianos, lo que hace que la ampliación y la reducción sean muy rápidas y muy fáciles de lanzar más contenedores a medida que los necesitemos o cerrarlos porque ya no los necesitamos.
Portablilidad: Podemos moverlos con mucha facilidad. Vamos a entrar en imágenes y registros. Pero esencialmente, podemos tomar instantáneas de nuestro entorno y subirlas al registro público / privado y luego descargar esas imágenes para hacer contenedores en cualquier lugar.
Implementaciones: Podemos ejecutar estos contenedores en casi cualquier lugar para implementarlos, es decir, computadoras de escritorio, computadoras portátiles, máquinas virtuales, nubes públicas / privadas, etc.
En este artículo, estoy explicando cómo instalar Docker en el servidor Ubuntu 1604 y ejecutar Puppet dentro de un contenedor Docker.
Instalación de Docker
Es compatible con casi todos los sistemas operativos. Para instalar Docker en un servidor Ubuntu, se requiere una arquitectura de 64 bits y una versión kernal de al menos 3.10. Comencemos con los requisitos previos de instalación.
Prerrequisitos
Verifique la versión y la arquitectura del kernel
Podemos usar estos comandos para confirmar la arquitectura y la versión del kernel de nuestro sistema operativo.
root@ubuntu:~# arch
x86_64
root@ubuntu:~# uname -r
4.4.0-21-generic
Ahora, el siguiente paso es actualizar los paquetes del repositorio APT. Además, debemos asegurarnos de que se ejecute con https e instalar los certificados de CA necesarios. Ejecute el siguiente comando para lograr esto.
root@ubuntu:~# apt-get update

root@ubuntu:~# apt-get install apt-transport-https ca-certificates
Reading package lists... Done
Building dependency tree
Reading state information... Done
ca-certificates is already the newest version (20160104ubuntu1).
The following packages will be upgraded:
apt-transport-https
1 upgraded, 0 newly installed, 0 to remove and 54 not upgraded.
Need to get 25.7 kB of archives.
After this operation, 0 B of additional disk space will be used.
Do you want to continue? [Y/n] y
Get:1 http://mirrors.linode.com/ubuntu xenial-updates/main amd64 apt-transport-https amd64 1.2.12~ubuntu16.04.1 [25.7 kB]
Fetched 25.7 kB in 0s (2,540 kB/s)
(Reading database ... 25186 files and directories currently installed.)
Preparing to unpack .../apt-transport-https_1.2.12~ubuntu16.04.1_amd64.deb ...
Unpacking apt-transport-https (1.2.12~ubuntu16.04.1) over (1.2.10ubuntu1) ...
Setting up apt-transport-https (1.2.12~ubuntu16.04.1) ...
Creación de un archivo de repositorio para Docker
Asegúrese de que el archivo de configuración de su repositorio esté configurado correctamente para descargar los paquetes para Docker.
root@ubuntu:/etc/apt/sources.list.d# cat /etc/apt/sources.list.d/docker.list
deb https://apt.dockerproject.org/repo ubuntu-xenial main
Una vez agregado, puede actualizar los paquetes una vez más ejecutando «apt-get update». Asegúrese de que tome las actualizaciones de los repositorios correctos. Elimine cualquier paquete de Docker antiguo si existe.
root@ubuntu:/etc/apt/sources.list.d# apt-get purge lxc-docker
Reading package lists... Done
Building dependency tree
Reading state information... Done
Package 'lxc-docker' is not installed, so not removed
0 upgraded, 0 newly installed, 0 to remove and 54 not upgrad

root@ubuntu:~# apt-cache policy docker-engine
docker-engine:
Installed: (none)
Candidate: 1.11.2-0~xenial
Version table:
1.11.2-0~xenial 500
500 https://apt.dockerproject.org/repo ubuntu-xenial/main amd64 Packages
1.11.1-0~xenial 500
500 https://apt.dockerproject.org/repo ubuntu-xenial/main amd64 Packages
1.11.0-0~xenial 500
500 https://apt.dockerproject.org/repo ubuntu-xenial/main amd64 Packages
Instalar paquetes de Kernel
Para la versión Ubuntu Xenial 16.04, se recomienda instalar el linux_extra_image paquete que es compatible con el paquete Kernel. Este paquete habilita el controlador de almacenamiento Aufs. El controlador de almacenamiento AUFS toma varios directorios en un solo host, los apila uno encima del otro, proporcionando una única vista unificada.
root@ubuntu:~# apt-get install linux-image-extra-$(uname -r)
Reading package lists... Done
Building dependency tree
Reading state information... Done
The following additional packages will be installed:
crda iw libnl-3-200 libnl-genl-3-200 wireless-regdb
The following NEW packages will be installed:
crda iw libnl-3-200 libnl-genl-3-200 linux-image-extra-4.4.0-21-generic wireless-regdb
0 upgraded, 6 newly installed, 0 to remove and 54 not upgraded.
Need to get 39.0 MB of archives.
Instalación
Ahora podemos continuar con la instalación de Docker.
root@ubuntu:~# apt-get install docker-engine
Reading package lists... Done
Building dependency tree
Reading state information... Done
The following additional packages will be installed:
aufs-tools cgroupfs-mount git git-man liberror-perl libltdl7 libperl5.22 patch perl perl-modules-5.22 rename xz-utils
Suggested packages:
mountall git-daemon-run | git-daemon-sysvinit git-doc git-el git-email git-gui gitk gitweb git-arch git-cvs git-mediawiki git-svn
diffutils-doc perl-doc libterm-readline-gnu-perl | libterm-readline-perl-perl make
The following NEW packages will be installed:
aufs-tools cgroupfs-mount docker-engine git git-man liberror-perl libltdl7 libperl5.22 patch perl perl-modules-5.22 rename xz-utils
0 upgraded, 13 newly installed, 0 to remove and 54 not upgraded.
Need to get 24.8 MB of archives.
After this operation, 139 MB of additional disk space will be used.
Do you want to continue? [Y/n] y
WARNING: The following packages cannot be authenticated!
Inicie y confirme el estado de Docker
root@ubuntu:~# service docker start

root@ubuntu:~# docker version
Client:
Version: 1.11.2
API version: 1.23
Go version: go1.5.4
Git commit: b9f10c9
Built: Wed Jun 1 22:00:43 2016
OS/Arch: linux/amd64

Server:
Version: 1.11.2
API version: 1.23
Go version: go1.5.4
Git commit: b9f10c9
Built: Wed Jun 1 22:00:43 2016
OS/Arch: linux/amd64
root@ubuntu:~#
El siguiente comando descarga una imagen de prueba, a saber, hello-world, del registro de Docker y la ejecuta en un contenedor. Cuando el contenedor se ejecuta, imprime un mensaje informativo. Luego, sale. Por lo tanto, podemos confirmar que Docker está funcionando.
root@ubuntu:~# docker run hello-world
Unable to find image 'hello-world:latest' locally
latest: Pulling from library/hello-world
4276590986f6: Pull complete
a3ed95caeb02: Pull complete
Digest: sha256:a7d7a8c072a36adb60f5dc932dd5caba8831ab53cbf016bcdd6772b3fbe8c362
Status: Downloaded newer image for hello-world:latest

Hello from Docker.
This message shows that your installation appears to be working correctly.

To generate this message, Docker took the following steps:
1. The Docker client contacted the Docker daemon.
2. The Docker daemon pulled the "hello-world" image from the Docker Hub.
3. The Docker daemon created a new container from that image which runs the
executable that produces the output you are currently reading.
4. The Docker daemon streamed that output to the Docker client, which sent it
to your terminal.

To try something more ambitious, you can run an Ubuntu container with:
$ docker run -it ubuntu bash

Share images, automate workflows, and more with a free Docker Hub account:
https://hub.docker.com

For more examples and ideas, visit:
https://docs.docker.com/engine/userguide/
Ahora estamos listos para comenzar con Docker. Podemos descargar todas las imágenes requeridas desde Docker Hub usando el comando
estirar del estibador Nombre de la imágen. Por ejemplo, veamos cómo estoy descargando algunas de las imágenes útiles.
root@ubuntu:~# docker pull ubuntu
Using default tag: latest
latest: Pulling from library/ubuntu
5ba4f30e5bea: Pull complete
9d7d19c9dc56: Pull complete
ac6ad7efd0f9: Pull complete
e7491a747824: Pull complete
a3ed95caeb02: Pull complete
Digest: sha256:46fb5d001b88ad904c5c732b086b596b92cfb4a4840a3abd0e35dbb6870585e4
Status: Downloaded newer image for ubuntu:latest
Esto ha descargado la imagen de Ubuntu desde Docker Hub y podemos usar esto para crear un contenedor de Ubuntu con esta imagen.
root@ubuntu:~# docker images
REPOSITORY TAG IMAGE ID CREATED SIZE
ubuntu latest 2fa927b5cdd3 11 days ago 122 MB
hello-world latest 94df4f0ce8a4 6 weeks ago 967 B
Creando Puppet dentro de un contenedor Docker
Para crear contenedores de marionetas, primero debemos descargar los paquetes de marionetas desde la ventana acoplable.
- marioneta / marioneta-agente-ubuntu
- puppet / puppetserver
- marioneta / puppetdb
- puppet / puppetdb-postgres
Veamos cómo descargué estas imágenes del centro de Docker. Puedes usar el comando docker pull Image_name para eso.
root@ubuntu:~# docker pull puppet/puppetserver
Using default tag: latest
latest: Pulling from puppet/puppetserver
5ba4f30e5bea: Already exists
9d7d19c9dc56: Already exists
ac6ad7efd0f9: Already exists
e7491a747824: Already exists
a3ed95caeb02: Already exists
158cd0fe54d8: Pull complete
7a15dfe1145a: Pull complete
0bb8d51ae57c: Pull complete
7b09944cb025: Pull complete
6bf96d82eed5: Pull complete
58fa7008c2bc: Pull complete
659b4b2b3359: Pull complete
0e205bb6d03b: Pull complete
915e3853b669: Pull complete
750b3208f97d: Pull complete
8fec247907de: Pull complete
Digest: sha256:c43290ca040a7693d9f41448eab4ff2444c61757aa303bd7979f7f1ef3e4ae95
Status: Downloaded newer image for puppet/puppetserver:latest

root@ubuntu:~# docker pull puppet/puppetdb
Using default tag: latest
latest: Pulling from puppet/puppetdb
0be59000882d: Pull complete
f20b6f990572: Pull complete
53662c966c9f: Pull complete
a3ed95caeb02: Pull complete
5eae59cbe62c: Pull complete
2b8ff6279504: Pull complete
612d7a4576b7: Pull complete
60577ed4c036: Pull complete
f99ad2d50f6f: Pull complete
9da7f43c61dc: Pull complete
e4c4271df64b: Pull complete
Digest: sha256:6532e4e3750183cd6951df6deb7bb1adb1e0e0ed37aa9e1e0294e257d73d9b1f
Status: Downloaded newer image for puppet/puppetdb:latest

root@ubuntu:~# docker pull puppet/puppetdb-postgres
Using default tag: latest
latest: Pulling from puppet/puppetdb-postgres
8b87079b7a06: Pull complete
a3ed95caeb02: Pull complete
ff6abb23e531: Pull complete
8364ca902ad3: Pull complete
84179c1b7ff6: Pull complete
be951654637c: Pull complete
4841dfc8333f: Pull complete
8e92fd62d485: Pull complete
13e5de4be2f2: Pull complete
d6aaf4d83b1c: Pull complete
3113f93aec6d: Pull complete
055e85b433f4: Pull complete
a97f9981bfe1: Pull complete
6c162fdd1104: Pull complete
Digest: sha256:d42428f0ecf75f7a0dbebee79cb45afaebfd193051fa1002e64fa026b2060f13
Status: Downloaded newer image for puppet/puppetdb-postgres:latest

root@ubuntu:~# docker pull puppet/puppet-agent-ubuntu
Using default tag: latest
latest: Pulling from puppet/puppet-agent-ubuntu
0be59000882d: Already exists
f20b6f990572: Already exists
53662c966c9f: Already exists
a3ed95caeb02: Already exists
576aca0f90fb: Pull complete
b1842b47756f: Pull complete
Digest: sha256:1867bcbe733adcbdfa004ec76ce8940a0927eef8877ee4f07b1ace4e68e7c5fa
Status: Downloaded newer image for puppet/puppet-agent-ubuntu:latest
Ahora hemos descargado todas las imágenes requeridas. Puede verlo ejecutando imágenes de docker mando.
root@ubuntu:~# docker images
REPOSITORY TAG IMAGE ID CREATED SIZE
puppet/puppetserver latest 0ac3058fad18 4 days ago 379.9 MB
puppet/puppetdb latest f3f9d8b3e54f 6 days ago 368.4 MB
puppet/puppet-agent-ubuntu latest 57fe50639909 6 days ago 202.9 MB
puppet/puppetdb-postgres latest 4f4ed55af431 10 days ago 265.8 MB
ubuntu latest 2fa927b5cdd3 11 days ago 122 MB
hello-world latest 94df4f0ce8a4 6 weeks ago 967 B
Antes de crear nuestro contenedor Puppet, necesitamos crear una red Docker para agregar estos contenedores Puppet como se muestra a continuación.
root@ubuntu:~# docker network create puppet
e1ebd861dbb39be31da81a88e411e7f4762814ee203b371fca7643a7bb6840eb
Creando el servidor Puppet Master
Podemos crear un servidor de marionetas con la imagen «puppet / puppetserver«con el nombre de marioneta en la red de marionetas con el nombre de host» marioneta-linóxido «.
root@ubuntu:~# docker run --net puppet --name puppet --hostname puppet.linoxide puppet/puppetserver
Warning: The following options to parse-opts are unrecognized: :flag
2016-06-08 09:36:24,348 INFO [o.e.j.u.log] Logging initialized @27125ms
2016-06-08 09:36:36,393 INFO [p.s.v.versioned-code-service] No code-id-command set for versioned-code-service. Code-id will be nil.
2016-06-08 09:36:36,394 INFO [p.s.v.versioned-code-service] No code-content-command set for versioned-code-service. Attempting to fetch code content will fail.
2016-06-08 09:36:36,396 INFO [p.t.s.w.jetty9-service] Initializing web server(s).
2016-06-08 09:36:36,450 INFO [p.s.j.jruby-puppet-service] Initializing the JRuby service
2016-06-08 09:36:36,455 WARN [p.s.j.jruby-puppet-service] The 'jruby-puppet.use-legacy-auth-conf' setting is set to 'true'. Support for the legacy Puppet auth.conf file is deprecated and will be removed in a future release. Change this setting to 'false' and migrate your authorization rule definitions in the /etc/puppetlabs/puppet/auth.conf file to the /etc/puppetlabs/puppetserver/conf.d/auth.conf file.
2016-06-08 09:36:36,535 INFO [p.s.j.jruby-puppet-internal] Creating JRuby instance with id 1.
2016-06-08 09:36:53,825 WARN [puppetserver] Puppet Comparing Symbols to non-Symbol values is deprecated
(file & line not available)
2016-06-08 09:36:54,019 INFO [puppetserver] Puppet Puppet settings initialized; run mode: master
2016-06-08 09:36:56,811 INFO [p.s.j.jruby-puppet-agents] Finished creating JRubyPuppet instance 1 of 1
2016-06-08 09:36:56,849 INFO [p.s.c.puppet-server-config-core] Initializing webserver settings from core Puppet
2016-06-08 09:36:59,780 INFO [p.s.c.certificate-authority-service] CA Service adding a ring handler
2016-06-08 09:36:59,827 INFO [p.s.p.puppet-admin-service] Starting Puppet Admin web app
2016-06-08 09:37:06,473 INFO [p.s.m.master-service] Master Service adding ring handlers
2016-06-08 09:37:06,558 WARN [o.e.j.s.h.ContextHandler] Empty contextPath
2016-06-08 09:37:06,572 INFO [p.t.s.w.jetty9-service] Starting web server(s).
2016-06-08 09:37:06,606 INFO [p.t.s.w.jetty9-core] webserver config overridden for key 'ssl-cert'
2016-06-08 09:37:06,607 INFO [p.t.s.w.jetty9-core] webserver config overridden for key 'ssl-key'
2016-06-08 09:37:06,608 INFO [p.t.s.w.jetty9-core] webserver config overridden for key 'ssl-ca-cert'
2016-06-08 09:37:06,608 INFO [p.t.s.w.jetty9-core] webserver config overridden for key 'ssl-crl-path'
2016-06-08 09:37:07,037 INFO [p.t.s.w.jetty9-core] Starting web server.
2016-06-08 09:37:07,050 INFO [o.e.j.s.Server] jetty-9.2.z-SNAPSHOT
2016-06-08 09:37:07,174 INFO [o.e.j.s.h.ContextHandler] Started o.e.j.s.h.ContextHandler@18ee4ac3{/puppet-ca,null,AVAILABLE}
2016-06-08 09:37:07,175 INFO [o.e.j.s.h.ContextHandler] Started o.e.j.s.h.ContextHandler@4c1434a7{/puppet-admin-api,null,AVAILABLE}
2016-06-08 09:37:07,176 INFO [o.e.j.s.h.ContextHandler] Started o.e.j.s.h.ContextHandler@7eef9da2{/puppet,null,AVAILABLE}
2016-06-08 09:37:07,177 INFO [o.e.j.s.h.ContextHandler] Started o.e.j.s.h.ContextHandler@26ad2d06{/,null,AVAILABLE}
2016-06-08 09:37:07,364 INFO [o.e.j.s.ServerConnector] Started ServerConnector@66b8635c{SSL-HTTP/1.1}{0.0.0.0:8140}
2016-06-08 09:37:07,365 INFO [o.e.j.s.Server] Started @70146ms
2016-06-08 09:37:07,381 INFO [p.s.m.master-service] Puppet Server has successfully started and is now ready to handle requests
2016-06-08 09:37:07,393 INFO [p.s.l.legacy-routes-service] The legacy routing service has successfully started and is now ready to handle requests
Ahora tenemos nuestro Puppet Server creado y funcionando.
root@ubuntu:~# docker ps
CONTAINER ID IMAGE COMMAND CREATED STATUS PORTS NAMES
f4b9f456a4c2 puppet/puppetserver "dumb-init /docker-en" 3 minutes ago Up 3 minutes 8140/tcp puppet
Creando Puppet Client
Al ejecutar este comando, está creando otro contenedor como cliente Puppet con el nombre de host Puppeet-client-linoxide con la imagen de la ventana acoplable puppet / puppet-agent-ubuntu agent. Puede usar este comando para crear el cliente Puppet o simplemente puede usar Docker ejecutar –net puppet puppet / puppet-agent-ubuntu para construir uno. Si está ejecutando este comando, con un indicador único, lo que significa que Puppet sale después de la primera ejecución.
root@ubuntu:~# docker run --net puppet --name puppet-client --hostname puppet-client-linoxide puppet/puppet-agent-ubuntu agent --verbose --no-daemonize --summarize
Info: Creating a new SSL key for puppet-client-linoxide.members.linode.com
Info: Caching certificate for ca
Info: csr_attributes file loading from /etc/puppetlabs/puppet/csr_attributes.yaml
Info: Creating a new SSL certificate request for puppet-client-linoxide.members.linode.com
Info: Certificate Request fingerprint (SHA256): 62:E2:37:8A:6E:0D:18:AC:81:0F:F1:3E:D6:08:10:29:D4:D6:21:16:59:B7:6D:3F:AA:5C:7A:08:38:B6:6B:07
Info: Caching certificate for puppet-client-linoxide.members.linode.com
Info: Caching certificate_revocation_list for ca
Info: Caching certificate for ca
Notice: Starting Puppet client version 4.5.1
Info: Using configured environment 'production'
Info: Retrieving pluginfacts
Info: Retrieving plugin
Info: Caching catalog for puppet-client-linoxide.members.linode.com
Info: Applying configuration version '1465378896'
Info: Creating state file /opt/puppetlabs/puppet/cache/state/state.yaml
Notice: Applied catalog in 0.01 seconds
Changes:
Events:
Resources:
Total: 7
Time:
Schedule: 0.00
Config retrieval: 1.55
Total: 1.56
Last run: 1465378896
Filebucket: 0.00
Version:
Config: 1465378896
Puppet: 4.5.1
Pero si está usando este comando anterior, el contenedor no se cerrará, permanece en línea y actualiza Puppet cada 30 minutos según el contenido más reciente del servidor Puppet. Ahora tenemos nuestro servidor / cliente Puppet ejecutándose en nuestro Docker.
root@ubuntu:~# docker ps
CONTAINER ID IMAGE COMMAND CREATED STATUS PORTS NAMES
5f29866a103b puppet/puppet-agent-ubuntu "/opt/puppetlabs/bin/" 8 minutes ago Up 8 minutes puppet-client
f4b9f456a4c2 puppet/puppetserver "dumb-init /docker-en" 13 minutes ago Up 13 minutes 8140/tcp puppet
Creando PuppetDB
Podemos ejecutar un servidor PuppetDB en un contenedor acoplable. Para ejecutar PuppetDB, necesitamos un servidor Postgres en ejecución. Docker solo admite el servidor PostgreSQL. Esto también puede ser otra instancia de contenedor, un punto final de RDS (Servicio de base de datos relacional) o una base de datos física en algún lugar. Además, requiere un Puppet Master funcionando. Para usar certificados SSL durante la inicialización, necesitará al menos un maestro de marionetas de tokens en ejecución que el contenedor pueda conectarse para inicializar los certificados.
root@ubuntu:~# git clone https://github.com/tizzo/docker-puppetdb.git
Cloning into 'docker-puppetdb'...
remote: Counting objects: 12, done.
remote: Compressing objects: 100% (9/9), done.
remote: Total 12 (delta 3), reused 12 (delta 3), pack-reused 0
Unpacking objects: 100% (12/12), done.
Checking connectivity... done.

root@ubuntu:~# cd docker-puppetdb/
Cree un archivo Docker compatible con Ubuntu 16.04. tengo mi Dockerfile y ejecute el docker build.
root@ubuntu:~/docker-puppetdb# docker build .
Sending build context to Docker daemon 68.1 kB
Step 1 : FROM ubuntu:16.04
16.04: Pulling from library/ubuntu
5ba4f30e5bea: Already exists
9d7d19c9dc56: Already exists
ac6ad7efd0f9: Already exists
e7491a747824: Already exists
a3ed95caeb02: Already exists
Digest: sha256:f5edf3b741a08b573eca6bf25257847613540538a17b86e2b76e14724a0be68a
Status: Downloaded newer image for ubuntu:16.04
---> 2fa927b5cdd3
Step 2 : MAINTAINER Gareth Rushgrove "gareth@puppet.com"
---> Running in 555edbbd1017
---> a3d4cea623ac
Removing intermediate container 555edbbd1017
Step 3 : ENV PUPPETDB_VERSION "4.1.0" PUPPET_AGENT_VERSION "1.5.1" DUMB_INIT_VERSION "1.0.2" UBUNTU_CODENAME "xenial" PUPPETDB_USER puppetdb PUPPETDB_PASSWORD puppetdb PUPPETDB_JAVA_ARGS "-Djava.net.preferIPv4Stack=true -Xms256m -Xmx256m" PATH /opt/puppetlabs/server/bin:/opt/puppetlabs/puppet/bin:/opt/puppetlabs/bin:$PATH
---> Running in 4cb8a8220b1c
Una vez completado esto, podemos crear nuestro contenedor PuppetDB.
root@ubuntu:~# docker run --net puppet --name puppetdb-postgres -e POSTGRES_PASSWORD=puppetdb -e POSTGRES_USER=puppetdb -d postgres
855a6b13fefa4123d5e16cdde84ebc7174ba149e66699e4c94c14e8fbfcac22f

root@ubuntu:~# docker run --net puppet -d -P --name puppetdb --link puppetdb-postgres:postgres puppet/puppetdb
bfe56b64bd980d20570374ed8204136303d82de8cbf1a4279c2f2fd25a798f59
Todos nuestros contenedores están funcionando, incluso podemos confirmar su estado con este comando, docker ps Como se muestra abajo:

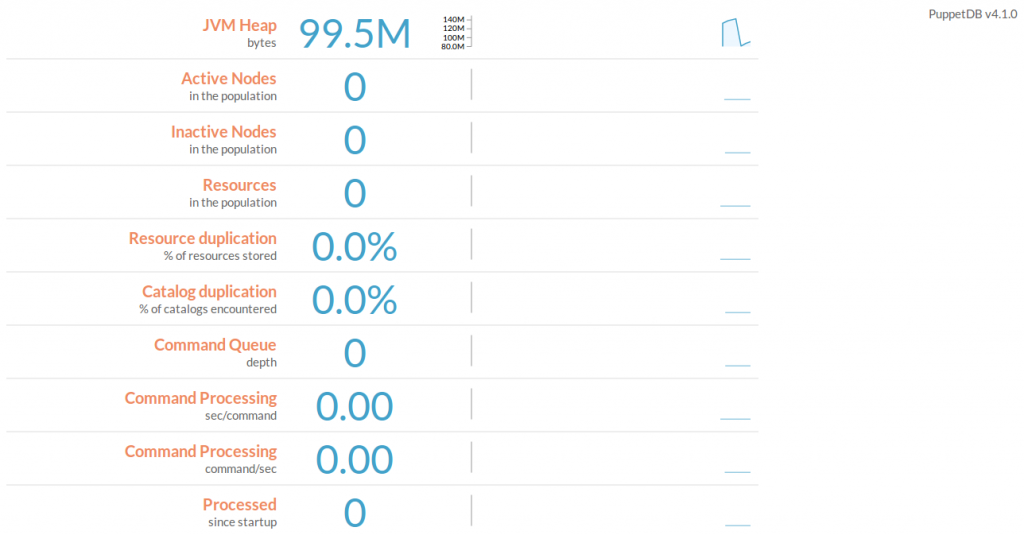
Podemos acceder a nuestro PuppetDB Dashboard en la URL >> http: // Docker-Server-IP: 32771
¡Viva! Así es como podemos hacer que Puppet se ejecute en una infraestructura de contenedores dentro de Docker. Espero que hayas disfrutado leyendo este artículo. Recomendaría sus valiosos comentarios y sugerencias al respecto.
¡Gracias! Que tenga un lindo día 🙂